Breathing new life into my ageing MacBook

The last quarter of 2013 was a truly exciting period for us Apple fanboys. With the launch of the new iMac, MacPro, iPhone and iPad – I was utterly white-knuckled from the sheer anticipation of seeing the line-up for the new MacBooks. But much to my dismay, none of the new MacBooks (either from the MBA or the rMBP line) tickles my fancy. It would’ve been a real treat if Apple launched a 13-incher that packs a quad-core i7 and/or a discreet video card. Sigh…
There are idiots purists who’d say that such specs should only belong to the bigger 15″ rMBPs “because you can’t design anything serious with a small 13-inch screen“; well… isn’t that what big-ass external monitors are for?! There are lots of professional designers, like me, who adore the portability of a 13” MacBook Air/rMBP — how it allows us to perform ‘less serious’ tasks on the go while knowing that that the machine is always ready to handle serious design work when we need it to.
So instead of just sulking while waiting for Apple to launch the next MacBook line-up, I’ve proactively decided to proceed in further upgrading my ageing Unibody MacBook White (late 2009): I’m resolved to install a Solid State Drive in it. Why? Because seeing how those new Macs in the applestores boot up in under 10 seconds and open applications like file folders was something that really made me covetous.
Here’s the plan…
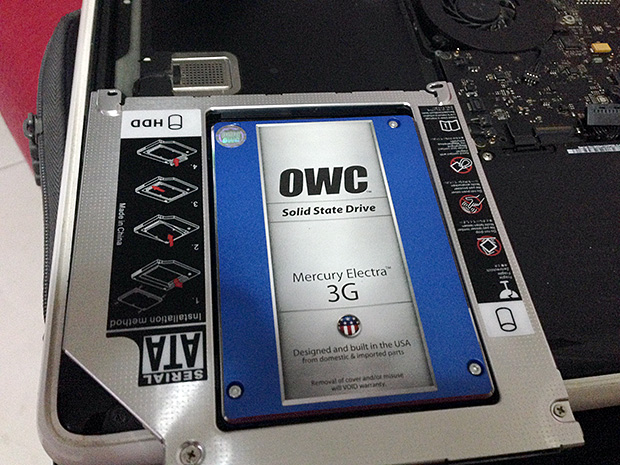
My plan though, was not just to swap the original HDD with a spanking new SSD. It was to extract the internal (DVD) SuperDrive and turn it into an external USB SuperDrive and then in its place, install the SSD (using an HD caddie) — where all of my OS and applications will be moved and be used as the startup disk. Sounds complicated? Well not really, there’s a lot of online resources which show you how to do this — I followed the instruction from iFixit.com (Installing MacBook Unibody Model A1342 Dual Hard Drive).
Here’s the breakdown of what was needed:
- SSD
- Hard Disk Caddie
- Optical Drive Casing
- Tools needed to dismantle and to put back together my MacBook


For the Solid State Drive, I’ve opted to purchase OWC’s Mercury Electra 3G (120GB for US$99.97) specifically for two reasons: First, because it’s in my best interest to NOT use a 6Gbps SSD because my MacBook model is equipped with a SATA 2.0 interface, which optimally works with 3Gbps drives; and because I’ve read so many good reviews and feedback from people who’ve used drives made by OWC.

For the HD Caddie, I got it from a mom-and-pops IT shop at Sim Lim Square for S$30.

And for the SuperDrive casing, I ordered it online from simplymac.sg for S$38.00.
As for the tools needed, namely they are: Phillips #00 Screwdriver, T6 Torx Screwdriver, T8 Torx Screwdriver and a nylon Spludger for poking/prying the connectors safely (I dind’t have one though, so I used my guitar pick).
Solve et Coagula
As it was my first time to actually perform surgery on my Mac, I made sure that I didn’t skip to make the mandatory backup of my system, and solemnly prayed to God that I wouldn’t do anything sinister and end up with a totally f*cked up machine.
So I unscrewed and popped open the bottom cover of the Mac and went to carefully extract the SuperDrive.

After that I slotted-in the SSD into the HD caddie and proceeded to install them into the partition where the optical drive used to be.


Now for the optical drive. The casing I’ve bought is pretty straight-forward to assemble. Much like playing with lego contraptions, I cracked open the casing to find a connector of the SuperDrive. I carefully connected the SuperDrive and snap-closed the casing.


After testing whether the thing works, finally finding a use for it, I placed one of my Apple logo stickers into it. And viola! My Handy-Manny itch has been satisfied and my OSX fires up faster than I can finish my first sip of cafe latte in the morning.

> Recent Posts
[Sale Alert] Buy a shirt will ya?!
Shameless Plug: $15 Tees + Everything Else on Sale Sale prices as marked. $15 price only applies to Regular T-shirts. Ends 9/12 at 5 PM CT. For more gaming-inspired graphic tees, please visit my Threadless Artist Shop: https://smaaash...
Bucket List #4: Attend an E3 convention, Comicon or something similar
#KidForLife (October 12, 2019) This post is a year late, and thanks to COVID-19 most of us are feeling an extra bit older than we should be. But finally having some ‘me time’ to rummage through my photos, I scrolled to this event and couldn’t help but feel nostalgic and remember how this bucket list item made me feel like a child again...
Bucket List #12: Experience Flying
Cowabunga! (October 5, 2017) …was probably the last word in my mind as I struggle to express the unholy mix of sheer excitement and overwhelming horror while I ‘fly’ down across Skyranch Tagaytay’s zipline...

Rockstar for hire. I help businesses create memorable branding experiences for their customers.


Thank you for posting this – I too have a late 2009 Macbook Unibody. I bought off Craigslist in 2012 for 350, and it has been the best computer I have owned. This was my first foray into Apple computers. Upon reading this, I ordered my RAM, SSD, battery, and HDD enclosure, and I was curious if you have any more tips/suggestions/upgrades/sources on how to make this machine last as long as possible. I’m thrilled this 6 year old MacBook has lasted this long on the original ram and superdrive and would love to keep it alive much longer.
thanks, Thomas
Hello Thomas,
Thanks for visiting my blog. It seems like a lot of MBW unibody owners are steadily finding their way to my blog. And I think it’s awesome that there are still quite a number of us who appreciate finely built machines, and not just simply upgrade to the latest MBP model just because we can. I’ve been using mine since 2009 and am actively doing creative work with it and Adobe Creative Suite – heck I’m even playing DOTA 2 with this baby.
In case you’ve wondered whether you can upgrade your MBW unibody to OS X Yosemite, you may want to check out a post I’ve done regarding the deed ( http://lance.sison.me/2014/11/running-os-x-yosemite-on-a-late-2009-macbook-white/ ). You may also want to check out the ‘SMC Fan Control’ app for the OS X – it sure is handy for keeping your Mac optimally cool.
Hope this helps. Do feel free to further comment if you have any other questions.
Cheers,
Lance
Lance, thanks again for the suggestions. Installing the RAM, battery and SSD was significantly easier than expected, and took very little time and my MacBook is running much faster.
Currently downloading Yosemite and smcFanControl upon your suggestion. Bookmarking your site.
thanks again, Thomas